I have some old electronics with white plastic that's starting to turn yellow. I know it's caused by flame retardants, UV rays, and so on. How can I restore my electronics to their former color?
-
There is actually a huge amount of information on the web if you search for "bleaching yellowed plastics", and the top results are actually related to retro-equipment. Not sure what that means for this question.– user12Commented May 3, 2016 at 16:15
-
See here: Restoration of a MSX Turbo-R by Javi Lavandeira. One of the steps in the process is the whitening of case and keyboard.– KonamimanCommented May 5, 2016 at 10:37
4 Answers
Search the web for the term "Retrobrite" or "Retr0bright". You will also find numerous sources (including YouTube) for recipes and how-to's using OxyClean and other sodium percarbonate-based products which yield hydrogen peroxide in solution or in a paste form.
These techniques are very popular for whitening cases with the Apple ][ and Atari communities. You can expect to do some experimenting with solution concentrations and light exposure to get the best possible effect. Good luck.
-
1Is the effect permanent? Are there any side effects? Commented May 3, 2016 at 20:25
-
5There is good evidence of reversal even in the absence of UV sunlight from Tezza in New Zealand. There's a good thread with community discussion of this as well. Side effects may include increased brittleness and definitely include fading of logos etc. Remove what you can from each case before treatment.– PeterCommented May 8, 2016 at 17:37
I used the method outlined here by Javier Rivera on my Apple IIc Plus and it worked fine. Javier does a lot of RetroBrite projects and posts a number of results to the Apple II Enthusiasts Facebook group. He also gave a presentation on methods at KansasFest 2015 and did a live session with anyone who wanted to go through the process with him.
http://www.callapple.org/vintage-apple-computers/apple-ii/shining-a-light-on-retrobrite/
In case the link dies, I'll explain my experience a bit.
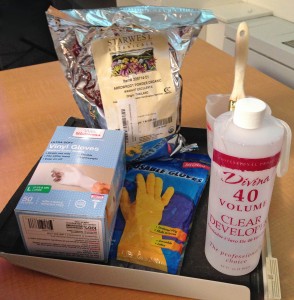
I went to Sally Beauty Supply. Not sure where you are, but that's a U.S. national chain. If you have a place that sells to consumer and/or professional hair-stylists and barbers, you can find a lot of the same supplies. I found the Peroxide 40 there. I also picked up the latex gloves and a couple of smaller items that are used to mix hair coloring agents. This consisted of a small plastic well with handle and a brush. This is what I used to mix everything up and paint the mixture onto the IIc Plus.
From Javier's recipe:
100 ml of liquid Peroxide 40, found in beauty supply shops
One teaspoon of Arrowroot powder
One teaspoon of OxyClean powder
Here's a picture from Javier's post.
I actually found Arrowroot and OxyClean at a grocery store.
Mixing everything together was a bit challenging. The Oxyclean had a tendency to clump in the arrowroot but I just kept mixing until I couldn't seem to make a difference with it any longer. Probably a good five minutes, honestly. I imagine a blender could be used for this, but I didn't try it.
Once done, I had a flat piece of wood that I covered with aluminum foil to try to point UV at sides and things that weren't actually facing the sky.
I dismantled the IIc Plus, removing the mainboard, the floppy, the power supply, the keyboard. This is a lot easier on a IIc Plus than what you might find on other retrocomputers but I imagine you don't want vintage electronics out in the sun.
I pushed out the multi-color Apple logo from the case and used masking tape to cover up the "Apple IIc" on the cover. I don't know that I really needed to cover that up, but I figured it couldn't hurt. Most recipes I've read mention that the procedure will damage the Apple logo so that's why I pushed it out. It was glued in place so it came out pretty easily and there was enough adhesive to re-stick it when I was done.
With the brush, I painted as smooth a coat as I could on the IIc Plus, the top and side surfaces. The mixture would foam up and every 45 minutes or so I would go back out and smooth out the covering again occasionally adding some more of the mixture. The IIc Plus is mostly large, flat pieces so I didn't have to do a lot of rotating. It was fairly challenging to cover it up well. The brush and arrowroot had a tendency to streak and I needed to keep working it until it was smooth.
I think I did this for about four hours, maybe less. Once done, I literally took a garden hose and rinsed off the pieces. After that, I brought everything in and dried it all then left it out for an hour to so to dry further.
The original color was definitely brought back on the surfaces that faced the sky. The sides are still a little darker but it doesn't bother me. I think if I had something that would bend the UV to more directly to hit the sides I probably would have had a better effect there. The option is always there to go back and do it again concentrating on the sides, but there is a measurable difference from before I started so I haven't worried about it.
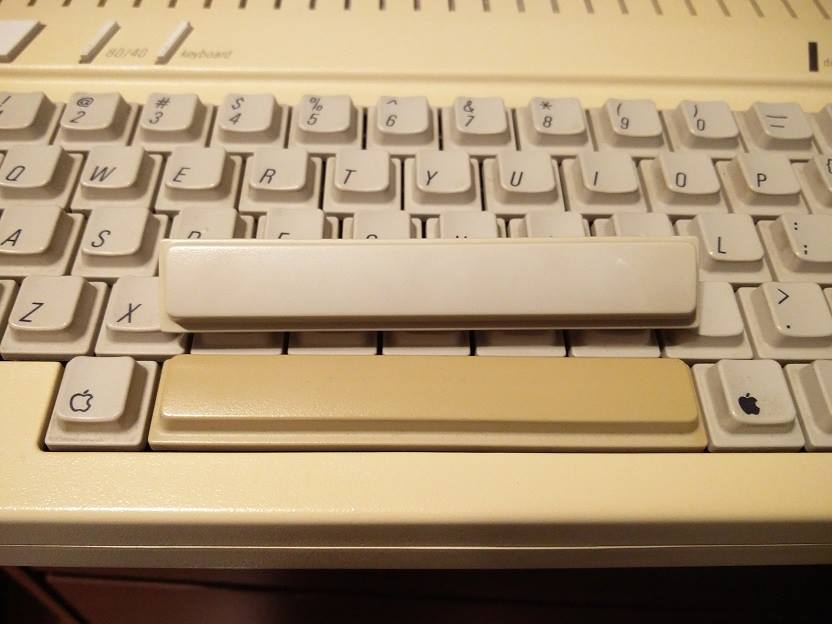
I would really like to do the keys, especially the spacebar which is more browned than anything else. I haven't done this myself. Here's what a member of the Apple II Enthusiasts group on Facebook posted:
Eduardo Correa Lima May 8 at 9:03pm · Vancouver, BC, Canada
First retrobrite attempt. Set of //c keys.
3 teaspoons of Oxyclean, 3% Hydrogen Peroxide. Put all key caps in a glass jar with enough peroxide to cover the keys. Put in the Oxyclean, then agitate the jar.
Leave in sunlight for 3 hours, agitating every hour.
His results are great!
Hope this helps.
-
Link-only answers are not great for SE, because most links simply disappear eventually. Can you expand this answer to outline the steps you followed? Also, who is "Javier Rivera" and why do we care? It's best to cite specifics.– user12Commented May 11, 2016 at 15:34
-
Whoa. I was maybe suggesting a few bullet-points, not demanding a whole process! You've made a killer answer there, so +1.– user12Commented May 11, 2016 at 16:11
I have used recipes from here with great success:
http://www.retr0bright.com/make.html
I used the second recipe with a high concentration hydrogen peroxide. I was able to find the high concentration hydrogen peroxide at a local co-op store marked as "food grade".
Here is that recipe:
Lorne's Variant Recipe
Lorne at Vintage Computer Forums prefers to use stronger Hydrogen Peroxide and his variant recipe is below.
- 1/2 pint (200ml) Hydrogen Peroxide, 30% strength
- 2 level teaspoons of Xanthan Gum
- 1 level teaspoon of Glycerine
- 1/4 teaspoonful of Oxy laundry booster
- 1 teaspoonful hot (not boiling) water
In a very small ceramic or plastic bowl/dish, dissolve the Oxy in the hot water. Lorne found that the Oxy doesn't want to dissolve in the paste/gel very well - this premixture of the Oxy fixed that problem. While the Oxy is dissolving, mix the Hydrogen Peroxide and Xanthan gum in the blender for five seconds. Add the Glycerine to that mixture and blend for another five seconds. Let this mixture sit for five minutes.Blend for another five seconds.
Just before you apply the gel, thoroughly stir in by hand, the dissolved Oxy/water mix.
Be careful using strong hydrogen peroxide recipes as it is caustic to the skin and will need frequent attention to avoid it drying and streaking. Check it often and reapply paste to prevent it from drying out.
In this video:
The producer uses hydrogen peroxide and sunlight to de-yellow his plastics. The results look really good, but there is not much detail for his formula.
-
Folks use this method to whiten LEGO, as well. Though, many people use oxygen bleach (which is essentially the same thing as H5O) and make a paste that can be applied to the yellowed parts.– user12Commented May 3, 2016 at 16:00
-
Also, see this answer to the related question: retrocomputing.stackexchange.com/a/236/12– user12Commented May 3, 2016 at 16:03

